Как создать сервер в Conan Exiles
Как создать сервер в Conan Exiles
Как создать сервер Conan Exiles (Windows) +Настройка
Автор: DEMA · Опубликовано 30.01.2017 · Обновлено 31.01.2017

Руководство как запустить пользовательский сервер Conan Exiles. Вы можете его установить на своем компьютере или на удаленном сервере.
Нужен ли нам SteamCMD?
Да, вам необходимSteamCMD. Файлы приложения разделены между самой игрой сервером игры.
Создание сервера:
Где найти файл «ConanSandboxServer-Win64-test.exe»?
- Создайте папку для SteamCMD и папку для файлов сервера Conan Exiles:
C:/steamcmd
C:/conanserver - Загрузите cредство обновления SteamCMD (Windows) . http://media.steampowered.com/installer/steamcmd.zip
- Извлеките содержимое архива папку. C: / steamcmd
- Щелкните правой кнопкой мыши в папке и создайте новый текстовый документ именем FetchServerFiles.bat и с содержанием:
@echo off
start “” steamcmd.exe +login anonymous +force_install_dir “C:/conanserver” +app_update 443030 +quit - Запустите FetchServerFiles.bat двойным кликом, чтобы загрузить все файлы сервера Conan Exiles установленных в C: / conanserver
Настройка файла запуска сервера .bat!
Нам нужно создать .bat файл, чтобы запускать ConanSandboxServer-Win64-test.exe с определенными командах.
Сейчас вы должны дождаться пока все файлы сервера загрузятся (около 12 Гб
) и должны быть готовы к запуску сервера.
Перейдите к папке с файлами сервера Conan Exiles (в нашем случае C:/conanserver)
Щелкните правой кнопкой мыши в папке и создайте новый текстовый документ. Назовите его как хотите. Я назвал его «startServer.bat».
Откройте его и скопируйте туда следующее:
Убедитесь, что вы изменили текст на свой
> X.X.X.X: Это IP сервера (сервис 2ip.ru поможет вам его узнать)
> ConanExiles.RU: Это имя вашего сервера во всех списках и т.д.
> ПАРОЛЬАДМИНА: Это пароль игрок должен будет ввести в консоле, чтобы пользоваться командами администратора.
> MaxPlayers=20: Это максимальное количество игроков, которым разрешено подключаться к серверу. (меняет только 20 на ваше количество)
Когда закончили настройку «Файл-> Сохранить как» в текстовом редакторе и сохраните файл вот так:
«StartServer.bat»
Убедитесь, что присутствует « в начале и конце. 
Теперь файл должен выглядеть вот так: 
Настройка конфигураций сервера Conan Exiles.
Где найти конфиг сервера? -> «C:conanserverConanSandboxSavedConfigWindowsServer» и называется он «ServerSettings.ini»
Есть и другой файл который вы можете редактировать (Engine.ini ):
Важно! Не трогайте значения и переменные, если вы не уверены в том, что они делают.
Например, вы можете зайти в игровой клиент, нажать Host / Local игра и увидеть все настройки там.
Это те же параметры которые вы видите в этих конфигурационных файлов .ini.
Хостинг сервера Conan Exiles
Проверьте свои порты!
Убедитесь, что у вас открыты порты 27015 и 27016 на маршрутизаторе (роутере) и брандмауэре Windows! Это важно!
Запуск сервера Conan Exiles! Как запустить сервер Conan Exiles?
Вернитесь в папку с .bat файлом и дважды щелкните этот файл .bat. Создастся небольшое командное окно на несколько секунд после него другое и выглядит оно вот так: 
Все, сервер работает. Требуется несколько минуты, чтобы он полностью зарегистрируется Conan Exiles и появиться в списке серверов.
Подключение к серверу Conan Exiles. Как подключится к серверу Conan Exiles?
Подключение игроков к вашему серверу:
Прежде всего, убедитесь, что сервер работает, выполнив следующие действия:
Откройте главное окно Steam, и откройте в вверху вкладку под названием «Вид». Там должна быть вкладка «Серверы»,. Перейдите к пункту «LAN» или локальная сеть и выберите Conan Exiles игра в нижнем фильтре игр. Обновляйте список до тех пор, пока не увидите сервер, это может занять некоторое время. (Работает если вы запустили сервер у себя на компьютере)
И да, вы видите свой собственный сервер в качестве сервера локальной сети.
Используя сервис 2ip.ru вы можете узнать свой ip адрес и дать его вашим друзьям.
Читайте также:

Как обновить сервер после выхода патча
Автор: DEMA · Published 30.01.2017 · Last modified 01.02.2017
комментариев 29
не работает команда @echo off
start «» steamcmd.exe +login anonymous +force_install_dir «C:/conanserver» +app_update 443030 +quit
Изменял на свою дирректорию, менял слеш (тут указан линуксовский), на «», все-равно результат плачевынй.
только что проверил и все работает
Сервер вроде стартует, но не появляется в списке, раньше на компе был сервер ARK, и все работало, так что порты точно открыты, в чем может быть проблема?
У меня сервер по локалке работает и отображается в списке серверов но при попытке подключится из вне то черный экран и в логе сервера ничего не фиксируется. а если зайти через стим и посмотреть сведения о сервере то в логе появляется запись:
[2017.02.01-18.59.23:307][586]LogNet: NotifyAcceptingConnection: Server ConanSandbox accept
[2017.02.01-18.59.23:307][586]LogHandshake: Error reading handshake packet.
И я так думаю это из за того что у меня не совпали некоторые параметры из батника старта сервера и сервер никак не хотел стартовать. Я поменял параметры ручками в конфигах:
у тебя GameServerPort=27015, а у меня в конфиге просто port=27015
Я не нашел в каком конфиге прописывается Multihome=X.X.X.X
Подскажите пожалуйста
Я первый раз сервер запускаю так что прошу не ругать. Удалите так как разобрался))
Ан нет не разобрался. все в силе: если запускать по вашему батнику то сервер падает не успев запустится, а если только убрать запись Multihome=X.X.X.X то запускается и локально работает но из всех параметров применяется только количество игроков, а порт и название встают стандартные.
кусок лога:
[2017.02.01-22.14.20:726][ 0]LogNet: Browse: /Game/Maps/ConanSandbox/ConanSandbox?Name=Player?Multihome=77.233.197.216?GameServerPort=27015?GameServerQueryPort=27016?ServerName=ConanExiles.RU?MaxPlayers=20?listen?AdminPassword=N
[2017.02.01-22.14.20:727][ 0]LogLoad: LoadMap: /Game/Maps/ConanSandbox/ConanSandbox?Name=Player?Multihome=77.233.197.216?GameServerPort=27015?GameServerQueryPort=27016?ServerName=ConanExiles.RU?MaxPlayers=20?listen?AdminPassword=N
[2017.02.01-22.14.31:131][ 0]LogAIModule: Creating AISystem for world ConanSandbox
[2017.02.01-22.14.31:132][ 0]LogWorld: Game class is ‘BaseGameMode_C’
[2017.02.01-22.14.31:133][ 0]ConanSandbox:Display: cwd: C:/conanserver/ConanSandbox/Binaries/ThirdParty/IP2Location/IP2LOCATION-LITE-DB1.BIN C:conanserverConanSandboxBinariesWin64
[2017.02.01-22.14.31:175][ 0]LogOnline:Warning: STEAM: Failed to initialize Steam, this could be due to a Steam server and client running on the same machine. Try running with -NOSTEAM on the cmdline to disable.
[2017.02.01-22.14.31:177][ 0]LogOnline:Display: STEAM: OnlineSubsystemSteam::Shutdown()
[2017.02.01-22.14.31:177][ 0]LogOnline:Warning: STEAM: Steam API failed to initialize!
[2017.02.01-22.14.31:178][ 0]LogOnline:Display: STEAM: OnlineSubsystemSteam::Shutdown()
[2017.02.01-22.14.31:180][ 0]LogInit: WinSock: Socket queue 131072 / 131072
[2017.02.01-22.14.31:184][ 0]LogNet:Warning: Failed to init net driver ListenURL: /Game/Maps/ConanSandbox/ConanSandbox?Name=Player?Multihome=77.233.197.216?GameServerPort=27015?GameServerQueryPort=27016?ServerName=ConanExiles.RU?MaxPlayers=20?listen?AdminPassword=N: WinSock: binding to port 27015 failed (21)
[2017.02.01-22.14.31:186][ 0]LogNet: NetworkFailure: NetDriverListenFailure, Error: ‘WinSock: binding to port 27015 failed (21)’
[2017.02.01-22.14.31:187][ 0]LogOnline:Warning: NULL: Can’t destroy a null online session (Game)
[2017.02.01-22.14.31:188][ 0]LogWorld: Failed to listen: WinSock: binding to port 27015 failed (21)
[2017.02.01-22.14.31:188][ 0]LogNet:Error: LoadMap: failed to Listen(/Game/Maps/ConanSandbox/ConanSandbox?Name=Player?Multihome=77.233.197.216?GameServerPort=27015?GameServerQueryPort=27016?ServerName=ConanExiles.RU?MaxPlayers=20?listen?AdminPassword=N)
[2017.02.01-22.14.31:663][ 0]LogWorld: Bringing World /Game/Maps/ConanSandbox/ConanSandbox.ConanSandbox up for play (max tick rate 0) at 2017.02.02-01.14.31
[2017.02.01-22.14.31:664][ 0]LogOnline:Warning: NULL: AutoLogin missing AUTH_LOGIN=.
[2017.02.01-22.14.31:667][ 0]LogOnline:Error: Failed to bind listen socket to addr (77.233.197.216:14001) for LAN beacon
[2017.02.01-22.14.31:667][ 0]LogOnline:Warning: Failed to init to LAN beacon
Прошу помощи. и почему 77.233.197.216:14001 когда порт другой указываю в каком конфиге это прописано подскажите
В логе строки где ругается на порты просьба пропустить я только увидел что немного стары лог кинул а то я тут с разными портами пробовал)
Вывод таков на стандартных параметрах с на портах например 7015 и 7016 работает в локалке без проблем без глюков все ок. но не видно его в стиме.
Ставлю порт 27015 и 27016 становится видно сервер в стиме но при запуске черный экран и все баста. В логах ничего типо ждет подключения пользаков.
Ставлю на сервере порты 7015 и 7016 на роутере перенаправляю на них с портов 27015 и 27016 итог. сервер работает начинается спам в логах
[2017.02.01-18.59.23:307][586]LogNet: NotifyAcceptingConnection: Server ConanSandbox accept
[2017.02.01-18.59.23:307][586]LogHandshake: Error reading handshake packet.
пока не отключишь порты на роутере.
Если прописать параметр Multihome=77.233.197.216 сервер не стартует ругается
LogNet: NetworkFailure: NetDriverCreateFailure, Error: »
[2017.02.01-23.00.50:920][ 0]LogNet:Error: LoadMap: failed to Listen(/Game/Maps/ConanSandbox/ConanSandbox?closed)
[2017.02.01-23.00.50:973][ 0]LogWorld: Bringing World /Game/Maps/ConanSandbox/ConanSandbox.ConanSandbox up for play (max tick rate 0) at 2017.02.02-02.00.50
[2017.02.01-23.00.50:974][ 0]LogOnline:Warning: NULL: AutoLogin missing AUTH_LOGIN=.
[2017.02.01-23.00.50:977][ 0]LogOnline:Error: Failed to bind listen socket to addr (77.233.197.216:14001) for LAN beacon
[2017.02.01-23.00.50:978][ 0]LogOnline:Warning: Failed to init to LAN beacon
На этом всё. Жду помощи. простите что на спамил сообщений. кнопки удалить или редактировать сообщения не вижу.
Советы и гайды по Conan Exiles – Как создать приватный сервер

Всем привет. Сегодня в нашем гайде по Conan Exiles мы дадим несколько советов о том, как создать приватный сервер в игре. Это отличный способ, чтобы играть в Conan Exiles со своими друзьями и никто другой вам не мешал..
Итак, вот пошаговая инструкция по созданию приватного сервера в Conan Exiles:
Шаг 1: Для начала вам необходимо скачать SteamCMD, который доступен в zip архиве по ссылке с нашего сервера:
Шаг 2: Извлечь содержимое архива steamcmd.zip в любую директорию (папку) по вашему желанию.
Шаг 3: Создайте отдельную папку для установки сервера. Например, C:Exiles.
Шаг 4: После распаковки архива нажмите на steamcmd.exe – запустится окно терминала. После выполнения ряда преднастроек в окне появится курсор ввода. >
Шаг 5: Для того, чтобы установить сервер, выполните поочередно следующие команды (для подтверждения ввода после набора команды нажимайте кнопку Enter):
login anonymous
force_install_dir C:Exiles
app_update 443030
После чего дождитесь установки сервера в директорию, это может занять некоторое время. После завершения установки в консоли снова появится курсов ввода. Наберите команду:
Шаг 6: Запуск сервера. Перед запуском сервера убедитесь, что у вас не запущен Steam. Если он запущен, то при запуске сервера вы увидите несколько ошибок, связанных с библиотеками DLL (вы можете их проигнорировать).
Для запуска приватного сервера Conan Exiles вам нужно будет запустить файл ConanSandboxServer.exe, который лежит в вашей папке C:Exiles.
По умолчанию программа будет прослушивать UDP-порты 27015 и 7777, которые нужны для использования сервера. Возможно, вам придется добавить их в исключения брандмауэра для получения сервера, который будет отображаться в списке серверов Steam.
Затем вы можете использовать следующие параметры командной строки, например:
ConanSandboxServer.exe -log -MaxPlayers=16
Другие параметры, которые могут понадобиться для серверов, включают в себя:
-log
MaxPlayers=70
ServerName=ConanExilesServer
MULTIHOME=aaa.bbb.ccc.ddd (выберите сетевой интерфейс по протоколу ip)
QueryPort=27015 (порт запроса Steam)
На этом все, после заходите в Conan Exiles и выбираете свой созданный сервер. Ну а на этом наш гайд по созданию приватного сервера подошел к концу. Спасибо за внимание. Надеюсь, наши советы вам помогли.
Как создать сервер в Conan Exiles

This guide will guide you 🙂 in how to install a dedicated server for Conan Exiles.
By following the steps in this guide you can setup a dedicated server with ease !
Please note that this guide is only intended for windows use (as there is no linux server out yet)
(unless wine is used on unix)
![]()
![]()


1. Download the SteamCMD Update Tool.
2. Create a folder on your disk to store the steamCMD executable in.
For this guide we will use ‘C:steamcmd’
3. Extract the zip file named ‘steamcmd.zip’ to the steamcmd folder you just created
4. Double click the executable to open it and let it download the required files.
5. When you see the ‘Steam>’ indicator in the cmd window please close the window.
(All the required files will be downloaded in its correct location)
Congratulations on downloading and installing the steamCMD
Now we are going to install the Conan Exiles Server files.
First we are going to create some configuration files (which we can easily use to start and update our Conan Exiles server files)
1. Create a directory where you want the steamCMD to install your Conan Exiles server files.
For this guide we will use K:Conan
2. Create a file named ‘install.txt’ with the following contents:
@ShutdownOnFailedCommand 1
@NoPromptForPassword 1
login anonymous
force_install_dir K:Conan
app_update 443030 validate
quit
3. Move the file ‘install.txt’ inside the Conan folder (K:Conan)
4. Create a batch file named ‘install.bat’ with the following contents:
@echo off
title NightBits %1 Updater
%2steamcmd.exe +runscript %3install.txt
5. Move the file ‘install.bat’ inside the Conan folder (K:Conan)
6. Create a batch file named ‘start.bat’ with the following contents:
set gamename=”Conan Exiles”
title NightBits %gamename% Server
set steamcmd=C:steamcmd
set gamepath=K:Conan
set gameserverport=7777
set queryport=27015
set players=100
set servername=NightBits Conan
set adminpassword=MYCONANPASSWORD
set multihomeip=MYINTERNALSERVERIPADDRESS
call install.bat %gamename% %steamcmd% %gamepath%
echo Starting %gamename% server, please keep this window open for automatic restart to work..
echo (if you want to quit, close this window from the X, then issue CTRL-C in the server window)
call ConanSandboxServer.exe ConanSandbox?Multihome=%multihomeip%?GameServerPort=%gameserverport%?GameServerQueryPort=%queryport%?listen?AdminPassword=%adminpassword%?MaxPlayers=%players%?ServerName=”%servername%” -nosteamclient -game -server -log
popd
echo %gamename% server exited, restarting..
echo NightBits %gamename% Server was restarted on %date% at %time% >>%gamepath%restart.log
7. Change the bold text to your proper configuration variables.
steamcmd => Location where steamcmd is located (default: C:steamcmd)
gamepath => Location where Conan Exiles is located (default: K:Conan)
gameserverport => Gameserver port which is used to retrieve game data (default: 27015)
queryport => Port which is used for websites and steam to collect game information (default:27016)
players= => Max players which can join your server
servername => The server name which is given ti your hosted gameserver
adminpassword => The password which is used to make yourself an admin of the hosted server
multihomeip => The internal ipAddress of the server which is hosting Conan Exiles
8. Move the file ‘start.bat’ inside the Conan folder (K:Conan)
9. Double click the batch file ‘start.bat’ to start the server downloading
When everything is downloaded (and verified) the server will start.
After the server is done booting your Conan Exiles Server is ready for you.
10. Go to your steam browser to find your Conan Exiles Server. ^_^
As a bonus feature the server will restart automatically when it has crashed.
Please note that before people can connect to your server you would need to forward the correct ports in your router to your server PC. Also make sure that your server PC is not blocking the incoming/outgoing ports from communication due to a (windows) firewall .
The default game serverport is set by Conan to 7777. (For now it cannot be changed yet)
The following ports should be forwarded inside your router (and allowed in your firewall) for Conan Exiles to work:
UDP 7777 (default game server port) (steam browser server list connection)
UDP 7778 (default game server peer port) (direct connections to your server)
UDP 27015 and 27016 (default query ports (websites and steam))
IMPORTANT! It is required to set QueryPort to something other than 27015 if you are playing on the same computer that you are hosting on.
Below are quick steps for installing on Linux:
(For this guide Ubuntu was used)
Please change the variables in bold in the examples according to your system configuration
1. Install the latest Stable Wine version (as of writing version 3.0)
2. Install steamCmd:
3. Downloads the binaries and installs them into
/home/[USERNAME]/steamcmd/steamcmd.sh +@sSteamCmdForcePlatformType windows +force_install_dir /games/steam/conan +login anonymous +app_update 443030 validate +quit
4. For the first run of the Conan Server, you need to have Xvfb program installed:
sudo apt-get install xvfb
5. Start the server manually:
xvfb-run –auto-servernum –server-args=’-screen 0 640x480x24:32′ wine /games/steam/conan/ConanSandboxServer.exe -log
6. Create a bash file named ‘start.sh’ with the following contents:
#!/bin/sh
export WINEARCH=win64
export WINEPREFIX=/home/[USERNAME]/.wine64
gameserverport=7777
queryport=27015
players=100
servername=”NightBits Conan“
adminpassword=MYCONANPASSWORD
multihomeip=MYINTERNALSERVERIPADDRESS
#xvfb-run –auto-servernum –server-args=’-screen 0 640x480x24:32′ wine /games/steam/conan/ConanSandboxServer.exe “Multihome=$multihomeip?GameServerPort=$gameserverport?GameServerQueryPort=$queryport?listen?AdminPassword=$adminpassword?MaxPlayers=$players?ServerName=$servername -nosteamclient -game -server -log”
#xvfb-run –auto-servernum –server-args=’-screen 0 640x480x24:32′ wine /games/steam/conan/ConanSandboxServer.exe -log
xvfb-run –auto-servernum –server-args=’-screen 0 640x480x24:32′ wine /games/steam/conan/ConanSandboxServer.exe ConanSandbox?Multihome=$
7. Create a new service file ‘conan.service’ with the following contents:
(save it at: /etc/systemd/system/conan.service)
[Unit]
Description=NightBits Conan server
After=syslog.target network.target
8. Reload the services by typing: systemctl daemon-reload
9. Enable the service by typing: systemctl enable conan.service
10. Start the service by typing: systemctl start conan.service
Update script for Conan:
Created a bash file named ‘updateConan.sh’ with the following contents:
echo “NightBits Conan Server Updater”
echo “Stopping NightBits Conan Server . “
sudo systemctl stop conan.service
while ps axg | grep -F ‘ConanSandboxServer-Win64-Test.exe’ | grep -v -F ‘grep’ > /dev/null; do sleep 1; done
# Backup configuration files
echo “Backing up configuration files”
tarballName=”configBackup_$(date +%Y-%m-%d_%H-%M).tar.gz”
tarball2Name=”savedConfigBackup_$(date +%Y-%m-%d_%H-%M).tar.gz”
mkdir -p /games/steam/conan/configBackups
tar -zcvf /games/steam/conan/configBackups/$tarballName -C /games/steam/conan/ConanSandbox/Config .
tar -zcvf /games/steam/conan/configBackups/$tarball2Name -C /games/steam/conan/ConanSandbox/Saved/Config/WindowsServer .
How to Create a Conan Exiles Dedicated Server Guide
Creating a Conan Exile game server is an easy process that can be done from either a dedicated server or your home computer.
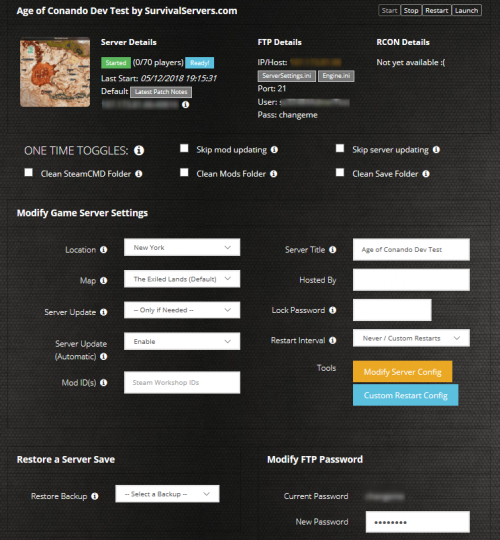
Option #1: Renting a Conan Exiles server (see example control panel below!)

Option #2: Creating a Conan Exiles Server From Your Home Computer or Dedicated Server
Server Requirements
Windows 7, 8, 8.1, Server 2008, Server 2012 & 64-Bit
Quad Core processor (requires up to 2 full cores)
4GB memory (currently uses around 4GB memory for 100 players filled)
20GB disk space (install folder)
Step 1: Fetching Game Server files from SteamCMD
The best method to get game server dedicated hosting files is via SteamCMD.
- Create a folder where you wish to store your Conan Exiles game server hosting files
- Inside of the folder, place the newly downloading SteamCMD.exe file
- Create a batch file named SteamCMD.bat
- Place the following code in this batch file: @echo off start “” steamcmd.exe +login anonymous +force_install_dir “C:SomePathWhereYouWantGameServerFilesToGo” +app_update 443030 validate +quit
- Right-click SteamCMD.bat and Run as Administrator
- Your game server files should be completely downloaded by now
Step 1 (alternate method): Locating Game Server Files on Hard Drive
You can host Conan Exiles directly from the game itself. If you want to change any settings, locate your common folder:
- Right-click Conan Exiles from Steam, select Properties
- Click Local Files tab
- Click ‘Browse Local Files button
Step 2: Setting up a Conan Exiles Dedicated Server
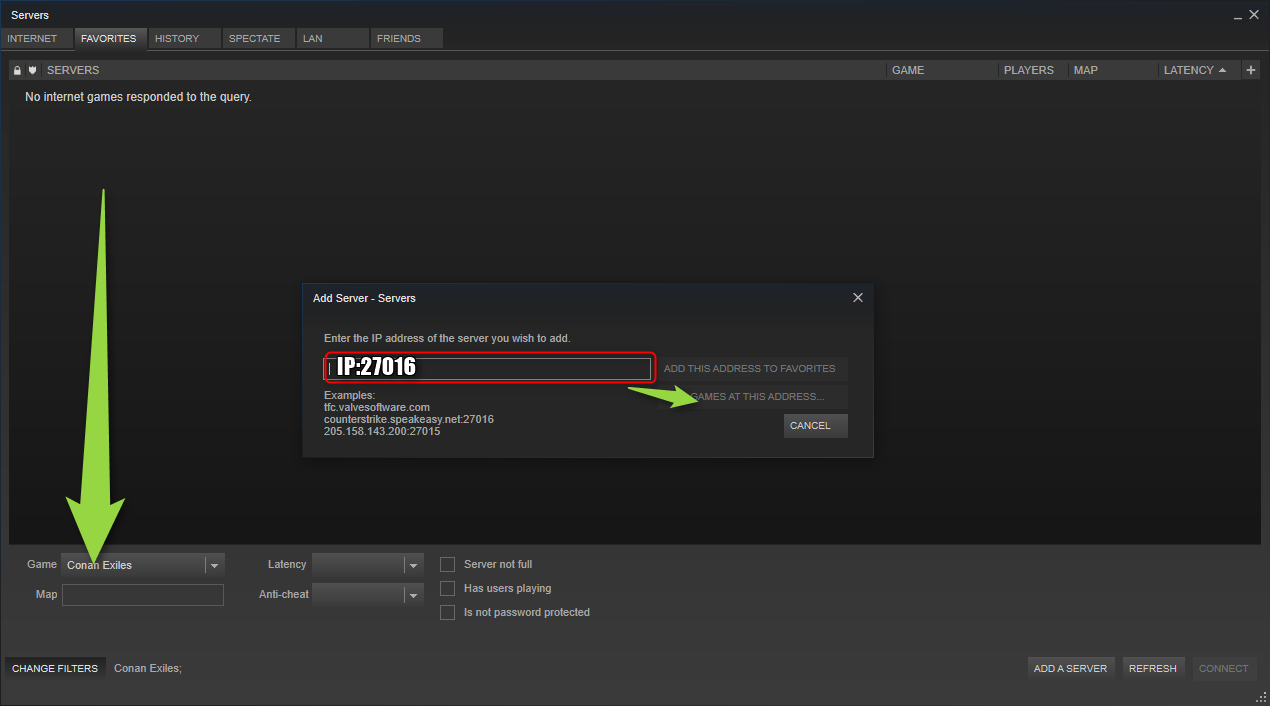
- Create a batch file named ConanExiles.bat in your newly created SteamCMD folder (Step 1) or your Steam common folder (Step 1: (alternate method)).
- Place the following code in this batch file: start “C:conanserverConanSandboxBinariesWin64ConanSandboxServer.exe” “ConanSandbox?Multihome=X.X.X.X?GameServerPort=27015?GameServerQueryPort=27016?ServerName=YOURSERVERNAME?MaxPlayers=20?listen?AdminPassword=YOURADMINPASSWORD” -nosteamclient -game -server -log
- More information will be coming on Jan 31 as server files are released
Step 3: Port Forwarding
Add an incoming rule to your Windows Firewall to allow UDP port 27015 as well as 27016 (or whichever port you are using).
You may additionally need to add a forwarding rule to your network router. You can use PortForward.com to read how to do this.
HOW TO JOIN YOUR SERVER
STEP 1: Update your server to the newest Conan version, then click the green update button at the bottom of the panel. * If you are not a Survival Servers customer ask your game server host about this.
STEP 2: Right click Steam in the task bar icons of your PC and select servers as pictured below.
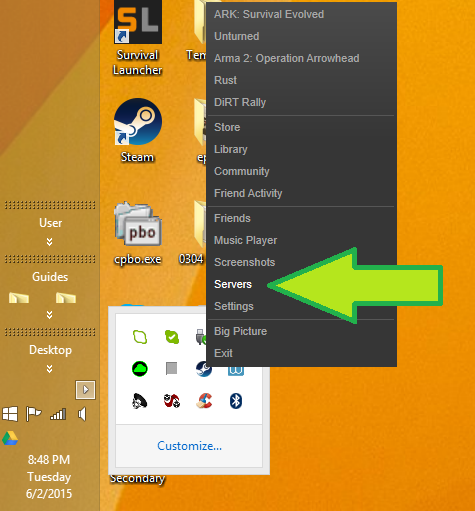
STEP 3: Select Conan Exiles as your game at the bottom. Join your server!
Configuring your Conan Exiles Game Server!
Now comes the fun part, setting up your Conan Exiles game server to your liking.
To modify game server settings you can open the ConanSandboxSavedConfigWindowsServerServerSettings.ini
You can modify settings in here (in addition to the launch line) – these settings overwrite your launch line settings:
How to setup a Conan Exiles dedicated server

Conan Exiles has just been released on Early Access and one of the cool features is the ability to create and run your own Conan Exiles dedicated server.
So how does it work? There are a few things needed to get up and running. First, you need to download the SteamCMD file, or Steam Console Client if as it’s also known.
Getting started with your Conan Exiles Server
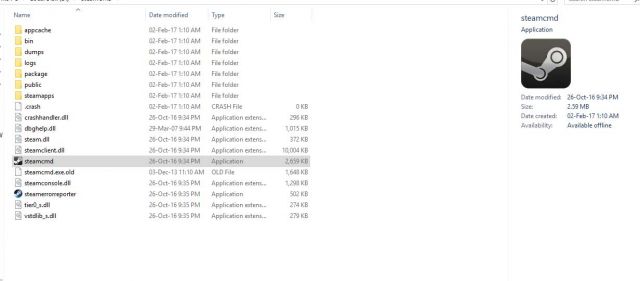
Create a directory for the downloaded files C:SteamCMD for example.
Double-click the file you just downloaded and let it extract all the files which will then be placed inside the new C:SteamCMD folder. It should end up looking like this:
If you are running another OS, the check the SteamCMD page for more info.
Method 1
- Launch the steamcmd executable.
- Once that load there’s a Steam> prompt.
- Type: login anonymous
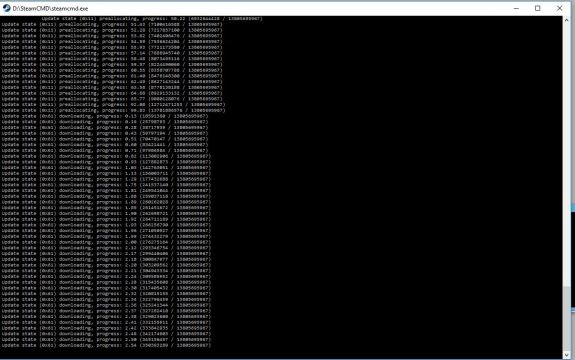
Once that is logged in and you see the Steam> prompt again it’s time to update files for Conan
The files will then download and you can see the progress as they come down.
Once that is concluded type “exit” to leave SteamCMD.
Important note: To update the files in the future follow the above then login and type app_update 443030.
Method 2
Create a file in C:SteamCMD called Conantupdater.bat and place the following:
@echo off
start “”steamcmd.exe +login anonymous +force_install_dir “C:PathToConanServer” +app_update 443030 validate +quit
Run this .bat file to update or install.
Setting up
Now the files are installed it’s time to set things up and running on your server.
Inside the C:SteamCMD folder look for the folder C:SteamCMDsteamappscommonConan Exiles Dedicated Server
Inside this folder is a file called StartSever.bat. Click this to launch the server. Once it’s completed you can close down the server and it’s time to start setting the server config to tailor it with its own rulesets.
Go to the folder C:SteamCMDsteamappscommonConan Exiles Dedicated ServerConan SanboxSavedConfigWindowsServer
Open the file SeverSettings in notepad or another editor like Notepad++. Check the variables in the file and change as needed. A list of settings can be found in the technical manual which contains common settings.
Settings should look like the following in the file:
[ServerSettings] AdminPassword=SecretPassword
MaxNudity=2
PVPEnabled=True
ServerCommunity=3 (This set the server ruleset type such as 0=none, 1=Purist, 2=Relaxed, 3=Hardcore, 4=roleplaying, and 5=experimental)
etc…
Also, check the Game.ini file which contains the setting for max players. Add the following:
MaxPlayers=XX (Whatever number you want to set)
Next it’s the Engine.ini file. Here you can set the following for example:
[OnlineSubsystemSteam] ServerName=My Server
ServerPassword=Password123
Port=27015
QueryPort=7777
[/script/onlinesubsystemutils.ipnetdriver] NetServerMaxTickRate=30
Finally create a file called ConanServer.bat inside C:SteamCMDsteamappscommonConan Exiles Dedicated Server and add the following text:
start ConanSandboxServer.exe -log
To limit the amount oif players on the server to be less than the default 40, change the .bat file to read:
start ConanSandboxServer.exe -MaxPlayers=12 -log
This will limit the player numbers to 12 on the server. Change that number it to whatever you require.
Important note: Ports 27015 and 7777 need to be opened on your server to allow communication with your server so check your firewall or anything that could potentially block these ports.
There is now a load of .ini files located in C:SteamCMDsteamappscommonConan Exiles Dedicated ServerConanSandboxSavedConfigWindowsServer
One file you may want edit is the Engine.ini file so you can name your server. All you need to do is add a line to the file which reads:
Another file you may want to edit is ServerSettings.ini and add the following line if you want to create a PvE server.
To create an admin password make sure the following line is added so you can login as admin…
These are of course not all the variables that can be set inside the .ini files so check the technical manual for more.
Run this ConanServer.bat file and your Conan Exiles server should be good to go.
Another point to note is that you may have issues if you are running the Steam client on the same machine you are running the server on. Shut down the Steam client.